Thursday, November 29, 2012

it's nearly Christmas!!!!!!!!!!!!!!!!!!!!!


can you believe December starts this weekend!!!!!that's only two sleeps away and then the silly season will start! Why not take the stress out and organise what people are to give YOU!!! I can do vouchers of cause  but also why not email a list of what you want to your family so they can contact me directly to ensure you get the Stampin' Up! goodies YOU want!! All you need to do is a list with the name of the product, the product number (together it will make sure you get the right thing!!) and the cost so they can pick what's in their budget! And if they ask nicely I will even wrap it for them (at no extra charge!).
I am putting an order in on Sunday so get picking and get the family to contact me before 6pm (NZ time of cause!).


Photobucket

Tuesday, November 27, 2012

a little gift box


Last night Tia took our online class at Crafters Anonymous and we made this sweet little box. The left hand piece is the lid and it slides over the longer part. You could put pencils etc in it for a kid starting school or a necklace on a card which is probably what I will use mine for.
I love Rich Razzleberry - don't you??

Photobucket

Monday, November 26, 2012

masculine 50th card


Later in the week it's my husband's cousin's 50th birthday and so I needed a card to send to him. I used the Specialty DSP for the card base and then wheeled music notes onto it. Using some pictures and strips cut from a DSP  helped make the card more colourful. I only 'stamped' the '50' and 'happy birthday' and used a bit of retired string to finish it off. I even wheeled the inside of the card and on the envelope.
Happy 50th Brian!!

Photobucket

Saturday, November 24, 2012

Christmas Advent Calender


I just finished making this advent calender all out Stampin' Up! products. I started by stamping all the numbers - I only used the three colour inks - Cherry Cobbler, Early Espresso and Gumball Green. I varied the colours and shapes I cut them out as I went. Then I cut out the 25 'peek-a-boo' frames with the Peekaboo Frames Bigz L die. It cuts 5 different shapes. Then I went and decorated them all - I didn't use any stamps - just dies and punches. I also didn't want to use the same DSP twice. I actually used two different DSPs - Be of Good Cheer and Candlelight Christmas Specialty. While the later has Real Red and Lucky Limeade you can't tell the difference on the project. :)


I used a cork board with a side white board that I got at a sale for $5. I had to fill the side panel but didn't want it to distract from the calender itself. So I decided to just add a sentiment and the only way I could fit the "MERRY CHRISTMAS" in was to make them like a Christmas tree! I had to take extra care to spell it right LOL!!!! 


thanks for visiting my blog today :)

Photobucket

Friday, November 23, 2012

the last of the simply simple seasonal session!

These are the last of the cards I made in the simple Christmas card line - or my "simply simple seasonal session" - LOVE that title! hee hee These are probably my least favourite ones but they might appeal to someone! lol 


thanks for visiting

Photobucket

Wednesday, November 21, 2012

no ordinary ornament


Here is another card from my easy Christmas card series. I did use a few punches for this (four in total) but it makes for a great quick card- esp. if you want to make a BIG pile to post out. The two Cherry Cobbler ornaments have been dry embossed to add texture. It's all down to a good basic design to make an easy card to make look effective. :)


Photobucket

Tuesday, November 20, 2012

a cracker of a cracker!


Last night on Crafters Anonymous we learnt how to make this awesome Christmas cracker that the talented Delys Cram designed a while back. It is very clever and simple to make. I created mine in Real Red and used Early Espresso (not black as it looks in the photos! lol)
It is six sided and it's 20cm long. I love it and I think I will make red and white ones for Christmas as that is my 'theme' this year!

Photobucket

Monday, November 19, 2012

Peek thru the window

this is such a quick simple card it's not funny! Start with a square of white card and sponge the sky and any ground you may want. Then stamp your scene and chop into four even pieces. Next just mount it on a white square with pieces separated to form the window frames. I used a stripped DSP to create 'wallpaper'. I kept it simple with my greeting but you could zazz it up anyway you like. Why not add curtains??? lol I did add some 'frost' of Dazzling Diamonds - since I live in a city that doesn't really get snow!  I reckon a wee cat peeking in thru the window would be really cute on this one! lol
Photobucket

Sunday, November 18, 2012

wreath on door card


this must be one of the EASIEST Christmas you can make. To do this one I used the awesome Early Espresso Co-ordinations card stock and the stripes embossing folder and gave it a little sand. To make the wreath I just used the Boho Blossoms punch and the dots came from the Cup Cake builder punch. I punched a 1"circle hole in some Old Olive card and then with a slightly bigger circle punch I created a ring to use as the base of the wreath. The door knob is a large brad and the sentiment is cut using the tiny banner die. There are SO MANY different versions of doors and wreaths you can do - check out my blog from two years ago-  here . There is one on the 1st December and 3 in late November.


Photobucket

Thursday, November 15, 2012

meet my candy boy


I had to share this with you - we will just have a one day break from the Christmas card series. He is the big bossy brother to my candy girls shown here
I used the retired stocking punch for his cool All Star boots, but everything else is current Stampin' Up! products. Somehow when making him he got a smudge on his cheek and I thought 'right he's going to be a rough and tumble kid' LOL! That was I made his face like I did, not smiling! I love doing punch art - you can create such cool expressions!!
Ok - back to cards tomorrow :)

Photobucket

Wednesday, November 14, 2012

sparkling snowflake


Here is another simple Christmas card. This one I actually taught at last night to a cool bunch of ladies at the Botany Birthing Unit (they were staff not new mums! hehe). The word strip of cause was done with the jumbo wheel Jolly Jingles (in Not Quite Navy) directly on to Whisper White. I layered it with a Not Quite Navy sandwich  The snow flake is cut from Brush Silver and layed with dimensionals and topped with a diamante. The three little bits of bling on the bottom right just help to balance the whole card out. If you felt like it needed another sentiment you would put it down in that corner too.
Tomorrow more Christmas cards for you :)

Photobucket

Tuesday, November 13, 2012

Diamond Corner card


This card is one I taught last night on Crafters Anonymous. It is a 'fancy fold' card but really easy. I used my favourite Christmas colour of Cherry Cobbler - this time mixing it up with Crumb Cake and Garden Green, plus a wee dash of Brushed Gold.
I used the corner punch to do the fancy bits, along with the bird punch for the greenery. The poinsettia is from Watercolour Winter which is in the Holiday Mini.
The sentiment is from Chock-full of Cheer from the Annual catalogue.
We will see you tomorrow with another Christmas card.

Photobucket

Monday, November 12, 2012

a cut out card - heart of Christmas


Here is another easy card. I start by cutting out the center part using the Big Shot and one of our dies. Then I embossed just the front - there is a trick to be able to get this embossing folder to emboss in this direction but you will have to come to a class or book a workshop/party to find that one out! lol
I added the white insert and then stamped the 'Heart of Christmas' stamp thru the cut out that way I get it in the right spot. I then re-stamped it in red and cut out just the line I wanted. Then stamp the holly and fussy cut it out and place it on the card. Easy Peasy!
see you tomorrow.

Photobucket

Sunday, November 11, 2012

tie a big bow on a card!

This was one of the EASIEST cards I've ever made. The new Stampin' Up! Tulle ribbon makes for an impressive bow but is very easy to do. I attached a strip of ribbon to the Whisper White card and then tie a piece to that. I turn the card upside down and make two loops - one on each end of the ribbon. Then I just knot it so this creates the bow, it's always nice and even AND by doing it upside down the 'legs' of the bow are in the right place. Don't know why it does it like that but it does! lol
see you tomorrow!

Photobucket

Saturday, November 10, 2012

Simple Christmas Card series - Brown Snow Deer

I have a dozen easy cards to show you. Each of these cards are fairly simple and easy but with good design makes them very effective.
This first card isn't my design at all - but whilst I don't often CASE other peoples work this card was soooooo cool I just had to - I didn't even change the colour as I LOVE non traditional colours for Christmas. It uses Lovely as a Tree which is the most popular stamp set we sell. It can be used for any time of the year. Here I used the single big tree. You stamp it several times without reinking to get the various trees. I sponged with a masking to get the hill edges and I actually used Dazzling Diamonds to give it a real snowy look.
The original designer of this card is Lisa Young - her blog www.addinkandstamp.blogspot.com and her card was posted on the 30th Sept.
See you tomorrow with another card :)

Photobucket

Friday, November 9, 2012

Pukeko's have arrived!!


one of the most commonly seen birds around New Zealnad and especially in Auckland where I live is the Pukeko. It's not native to New Zealand (I always thought it was!) but it's common around the world - mainly known as the purple swamphen. I learnt that bit of information when googling about the bird and from a friend in Australia (at 4am in the morning! lol). 
But a friend asked me if I could design something with a pukeko on it. So the first bird I came up with is above. It's made from the Elegant Bird Big Shot die and the beak is from the bird punch. The Christmas lights are made from the mini holiday punches from the current Holiday catalogue. Pukeko's are scavengers so the carry all sorts around their strong beaks. We have a tv ad in New Zealand that features a pukeko pulling all sorts of things so this was my inspiration for this card. 


Then I decided I would try to make some using the bird punch and these are them. I then decided they would be used for treat bags and instead of 'Rudolf' noses I would make them "Pukeko Eggs" being that the bright red beak and legs of the birds are so known.  


I am doing a market on Sunday so I shall see how they sell. If they don't they will be part of Christmas gifts. 


Photobucket

Thursday, November 8, 2012

Happy 18th Birthday Kim


Tomorrow (the 9th) is my niece Kim's 18th birthday and above is the card I made for her. We gave her a silver ring and thought I would continue the 'theme' of the black and silver of the jewelry box. Inside the cake I even stamped the word 'niece' inside the cake. I used silver embossing powder which looks great on the Basic Black cardstock. I even used the lovely shimmer paper for the card base. 
Below is the first card I made, but decided I wanted a cake on it rather than the shoe (as cool as that shoe is!!!). I will just put it away for next time I need a 18th card!


Photobucket

Tuesday, November 6, 2012

a cute little brag book


Last night on Crafters Anonymous Suzanne taught us this cool little brag book. It's about the same size as a cheque (check) book so it could pop into your handbag no problem! You could either cover it with DSP (patterned paper) or like I did some lovely fabric. Be nice if you had a wee piece of fabric that isn't much use for anything else. I used some polar fleece as the padding/wadding on it as I couldn't for the life of me find my stash of it! lol needs must!
I used Stampin' Up! fabric - Summer Smoochers and some lovely Lucky Limeade ruffled ribbon. Now all I need to fill it with pictures!!!!!!

Photobucket

a pair of 'sweeties'

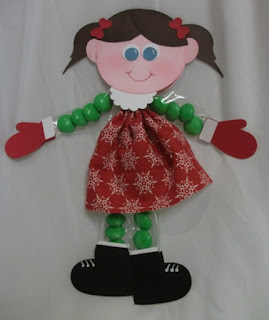
Aren't these just the cutest lolliygirls you've ever seen!!! The VERY talented Jackie Topa has a Youtube video on how to make them. She also has a full tutorial with this (and other amazing projects) available to purchase on her blog - http://jackietopa.typepad.com/


These are all 'punch art' which means all the shapes used are ALL current Stampin' Up! punches. Bet you can't work out how the shoes are made now we don't have the stocking punch??? And can you work out how the pony tails are done?? The dress is two different Stampin' Up! fabrics and is only an easy running stitch so not a hard project at all. Now to decide who might get these?????


Photobucket