Sunday, October 31, 2010

One Layer Card


here is the card that I used for my swap for the Creative Inkers team training yesterday. I love doing things that push you a bit further and I set myself a challenge of doing a one layer card. Well it's almost one layer.
The fold is the tri-fold shutter card that I have done a bit latterly. I just sized it down to cut 3 from my Crumb Cake A4. After cutting and scoring it I stamped it with the big En Francis back ground stamp. I had to use my faithful Stampin' ma gig to line up the words so it looks like it's all stamped just once. The scrolly vine from Vintage Vogue was just perfect for the corners and a bit of sponging around the edges all in Old Olive. I used the wreath from the AWESOME Welcome Christmas stamped in Cherry Cobbler. Don't forget the super bundle that Stampin' Up! are having - check out the flyer on the right of this post.
The last little bit was two tags from the Lots of Tags die set that I used thru the Big Shot. I used the single TO & FROM stamp, punched it out with the tag punches, a bit of Old Olive ribbon and she was all done!
Wait till you see what I have to show you tomorrow!! see you then!

Saturday, October 30, 2010

third Holiday Line Up card


here is the third and last card that I sent Flo
go check out her blog to see what she sent me - you wont be disappointed.

There are only three stamps in this set so I had to use each of them. The last one is the line up of elves which I just couldn't think what to do with them. Then I remembered my son's Where's Wally books and thought - ah ha! and that is sorta what I did. Although there isn't a 'Wally' to look for. To create the effect I had to stamp the image on to post it notes - I needed two of them. Once cut out this enables you to mask the areas where you have already stamped, thus creating the 'crowd' of elves.
To highlight them even more I used my white gel pen to bring out their eyes, finishing them with a dot for their pupils. I had to include the 'from all of us' sign from the Family Phrases set.
I think it turned out quite effective as I only used Crumb Cake ink & card stock and mounted it on a bit of Whisper White. Normally I like lots of layers but I think simplicity worked well for this card.

If you didn't get a chance to go on the Stampin' Up! Punches Blog Hop yesterday go and have a look now. Just click on the links in the previous post and you will be treated to some AWESOME work and come away with lots of ideas.

I am putting an order in on Monday 1st November so if there are any punchers (or any other Stampin' Up! products) that you MUST have (or lets just say NEED LOL) email me this weekend julia.leece@slingshot.co.nz.

thanks for visiting.

Friday, October 29, 2010

PUNCH ART BLOG HOP

Hello and welcome to the inaugural South Pacific punch art blog hop!!!We are a bunch of Stampin' Up! demonstrators from New Zealand and Australia who love our Stampin' Up!punches. We have gotten together to showcase a selection of the punches you can purchase from Stampin' Up!. We know we will inspire you and encourage you to use those punches in new and beautiful ways. Please leave a comment and let us know what you think to go in the draw to win some yummy scrummy punch art blog candy (offer not available to SU demos).

The way it works is that you go from blog to blog. There is a list at the bottom of this post with all the blogs that are participating. You may have come to my blog from Sally Williams and then go on to Amy's blog.


This is a first for me but it was so much fun coming up with these samples. My punch that I am highlighting is the Two Step Owl Extra Large Punch (118074) which for $41.50NZ/$33.95AUD is GREAT value when you see all the things you can make. This is only a sample of things you can do - if you have come up with other things please leave a comment with a link as we would LOVE to see them.


One of the cool things you can make with the owl punch is ALIENS! I thought I would take it to the next level and have a alien wedding - especially when I found the stamp from the 'A Word for You' (121474 wood mount $46.95NZ/$38.95AUD or 120528 clear mount $37.95nz/$29.95AUD) that just is perfect for this odd couple! lol


This card was one of the easiest card I have ever made. I was inspired to make it after I went to an 80's party for a friends 40th. Her sister Ann made a Pac Man cake - go visit her blog

The next series of photos are gift cards that are going on a friends 12 days of Christmas parcels. Over on Crafters Anonymous we each have a person for whom we buy or make 12 little pressies for them to open for the 12 days before Christmas. Each day had a theme and you will see I have typed in the photos the theme for each day - so you can sort of understand why the card has on it what it does. I thought I would take the opportunity to show case more ways of using the Owl punch.


Here is the list of demo's that are taking part in this blog hop. The hop officially starts at 12pm New Zealand time or 10am Sydney in Australia. As I am not proficient in working out how to set up a blog post to start at a certain day let alone a set time I am starting mine now! lol
1. Karen Southwell - www.kareniescrafts.blogspot.com
Thanks for joining in on the fun today!!

Thursday, October 28, 2010

JOY WREATH

I know I promised another Holiday Line card but I will show you that in the weekend! hehe
Today I have made this really cool wreath so I thought I would give it at a quick tutorial. The full tutorial PDF will be available FOR FREE as soon as I can work out how to attach it to here! LOL


Meanwhile you are welcome to email me direct julia.leece@slingshot.co.nz

TUTORIAL

Start with a foam ring and cover it with ink using a stamp pad.

Cut 60-80 leaves in two colours using the Big Shot Leaves #2 Original Die.

Adhere the leaves from the outside edge first, then the inside edge. It is best to bend the leaves for the remaining part to cover with your bone folder to help them bend around the ring.


Attached a piece of ribbon around the outside edge and secure with a pin. Attach enough ribbon to hang it from at top of wreath and top off with a bow.


Cut a piece of card stock and trim the edges to create a ribbon look. Using your bone folder again curl the card a bit then attach it to the wreath with Sticky Strip.
To add more detail I added red brads by the leaves to look like berries.


It's that easy!!


Wednesday, October 27, 2010

Holiday Line Up - card number TWO


this is the second of three cards that I made for a fellow Stampin' Up! demo for a swap. This card only has two colours - Marina Mist and Whisper White. I used my Aqua pen and ink pad to colour the snowmen, which enables you to get light and darker shades. I used the Petals a Plenty Big Shot embossing folder for the texture and the scallop boarder punch.

The style of card is called an 'easel card' so it can lay flat for posting etc but will sit up like this for display. Come back tomorrow for the third card.


Lots of people weren't able to attend the class on these little boxes last week so we have now made the tutorial available for purchase over on Crafters Anonymous. If you are not already a member and would like to join or know more about our ALL CRAFTS site email for an invitation or information on julia.leece@slingshot.co.nz

Tuesday, October 26, 2010

Holiday Line Up

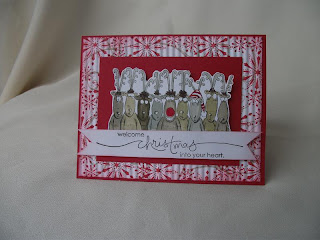
Over on Crafters Anonymous we held a swap where you get a partner and you make 3 cards using one stamp set. My partner Flo asked for Holiday Line Up (although she can't remember asking me! lol) so over the next few days I will blog the three cards that I sent her.

This is the first card. I stamped the reindeer and then used the Stampin' Up! Markers to colour them I even extended the arms and body down as I wanted them to 'taller' hehe
The background patterned paper I made using the Snow Swirled stamp set with Real Red and Crumb Cake ink. I sponged around the edges and then crimped it with the Stampin' Up! Crimper. Added a greeting from Heard from the Heart set and mounted it all on a Real Red base.
Come and visit tomorrow to see another Christmas card using the same stamp set but COMPLETELY different! lol

Monday, October 25, 2010

ok - not really craft related at all but......

I just HAD to share!! hehe
Over the long weekend here in New Zealand we have had the Mustang Convention where all the Mustang owners in the country got together. There was a car show and on Sunday night we had a banquet and prize giving event. Well my husband 2 years ago rebuilt a 1967 Notch Back (also known as a Hardtop) from scratch. We imported a reck from the States and he did everything on it, the body work, the painting, the engine, the interior - everything! He even used my old sewing machine to make some extra stuff!


This weekend was his first National competition and we were TOTALLY rapt to find we (well, we are a couple! lol) WON!!!!! We got 1st in the 1967-1968 Hardtop section. There was even a trophy and all!
The trophy is really hard to photograph as it is clear glass with the words etched into it but I am sure you can still get the idea! lol
Tomorrow I will be back to paper crafting - but thought you might like to see what another part of my family life is. Thanks for visiting.