Wednesday, February 13, 2013

You're Amazing

Here is another example of the divided pocket scrapbooking. This is my youngest taken when she was about 14 (early last year??) Her friends actually took the photos. I used the lovely little stack pack of DSP in the latest Seasonal Catalogue called Print Poetry - a great value product - 48 double sided sheets (4 of 12 designs) - 11.4cm x 16.5cm so PERFECT for card marking and now this new style of scrapbooking.
For some reason I didn't take close up of all the pockets, sorry :) The colours are Crumb Cake, Midnight Muse and Very Vanilla.

Photobucket

Tuesday, February 12, 2013

at 3


Here is a new form of Scrapbook - I don't know what it's called but I call it 'pocket scrapping' which means you get these pages with pockets (duh) and scrap withing them. Each sheet comes in a different formation - you get 10 sheets and there are all different bar 2. (Divided Page Protectors - 127690 $NZ11.95 pg 169 Annual Catalogue). They are great fun to do and would be a good way for a card maker to convert to scrapbooking cause you can decorate each little pocket like you would a card, just match up the theme, colours or embellishments. This young chap is my first born who is near 18 now so looks a bit different! He still has a lovely cheeky smile though! hee hee. I used the Birds of a Feather DSP and the colours are Crumb Cake, Island Indigo, Summer Starfruit and Whisper White.
I have also updated my GARAGE SALE page (above) so everything that is listed is available :)


Photobucket

Sunday, February 10, 2013

Brothers Scrapbook page


aren't these two cute!!!!! this is a photo my father-in-law took of his two youngest sons back in 1960! They are wearing vests, pants and shirts made by their mum, Peter on the left is about 5 and Craig - my husband - was about 3. I have great fun doing this page. I used two stamp sets, Clockworks and Daring adventure, along with cotton ribbon, Big Shot alpha, Silver Basics Designer Buttons and Soda Pop Tops. I stamped in Whisper White, Basic Grey and Basic Black.

 The back ground in Basic Grey that I distressed the edges and I stamped on the backing board that comes with DSP and mounted the whole lot together.
I've been doing a bit of scrapbooking laterly so I will share some more pages on here over the week. :)


Photobucket

Friday, February 8, 2013

I've made a dress shop!


I had a BALL making these today! I started by cutting out the mannequin's out of balsa wood (3mm) using the All Dressed Up! Stampin' Up! Framelit die - you could just use the dress from the Pop n' Cuts Dress Form to cut it too. I cut an extra 'foot' of each one and made a slit in the top of the middle shaft on the and a slit in the bottom of the whole mannequin so they can slip into each other. Then I made the dress all from new products from the Seasonal Mini.
This first one is made with the fabric in the Amore More fabric which I cut with framelits. The skirt is an oval that I cut a center out and then using a needle and thread to gather the center. The top is of cause part of one of the All Dressed Up! framelits. The ribbon is from the FREE Sale-a-bration button and ribbon pack. The button is from the clear mini buttons with a bit of Pool Party behind it and a jewel popped on.
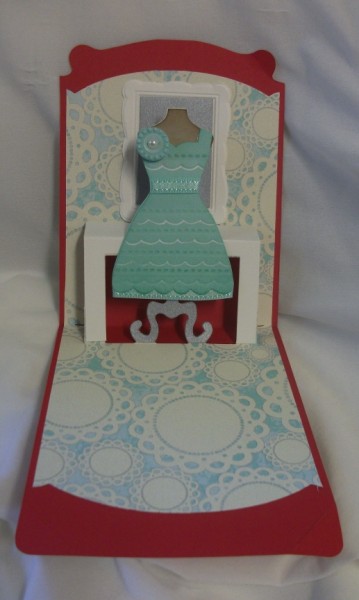
This one is of cause made from doilies. I used two doilies on the skirt and parts of another one for the bodice and a bit of taffeta ribbon.
This last one I made using the two tones ribbon and the bodice is the wide lace from the Embellishment pack which again I gattered. On the top I added some pearls for a bit of interest, and the straps are the narrow taffeta ribbon. Below is just another photo of them but I took it just as the last one was falling over! hehe I was impressed my camera did it without going blurry! blahahahhaha - thought it was worth a giggle!

Photobucket

Black and Lacey!!!


here is another of the Pop 'n Cuts Dress Form that I've made. This time I went for elegant. While flicking through the Parkers Patterns DSP I found this print that made me thing of leopard print so I went with it as the wall paper in my 'boudoir'. I made the dress with some coloured doily for the bottom of the dress and uncoloured for the lace on the chest. I also coloured some Basic Black Taffeta ribbon so it was the same colour as the card stock. I used one of the big jewels on the waistline too.
Again I covered the 'table' part but this time was with glossy white card as well as the mirror frame which I dry embossed then cut with a framelits die to get that cool shape.

I used another framelit to get the cool shape that the 'Wonderful You' is on. I cut it twice making it smaller and it gives another completely different shape - I think I will use that shape more!!!
The front I wanted to keep not to busy but I wanted a 'WOW' bow, I tied a bow using TWO ribbons and was really pleased how it turned out. The bottom of the black oval is dry embossed to match the dress inside but it doesn't show well on the photo.
Have a great weekend!!

Photobucket

Thursday, February 7, 2013

KEEP CALM and SHOP ON


I recently received the new Pop 'n Cuts Dress Form pop up card die and I LOVE it. It cuts the cool card shape plus the 'pop up' part. You can cut the card base separately to the dress part. The card base is very cool with the scalloped corners - this can pop into two little slits in the base of the card to keep it all together as shown in the photo below

The next photo is of the card when it's not locked in to the card base. I was lucky to have the Keep Calm stamp set given to me as a present from friend as it wasn't released here in New Zealand.

This last photo shows the full look when it's opened. I used the matching Framelits to make my Pool Party dress, the scallop texture was made by putting the dress thru one of the new embossing strips multiple times. I used the Sale-a-bration FREE ribbon and button topped with a wee pearl for the flower. I used the gorgeous shimmer white card for the table and mirror base. The table shape is part of the pop up card but I turned it into a table like the designer who designed this system. Here is the link to an awesome YouTube video on how it all works - http://www.youtube.com/watch?v=pFfETxLJnmw&feature=youtu.be

Photobucket

Wednesday, February 6, 2013

More cute little note books


Here are three more note books that I made. These are using the FREE Sale-a-bration DSP. I used punches, stamps and tools from the new Seasonal catalogue too. Don't forget to book your workshop/party before 22 March so you can get some of these FREE BEES!!! email julia.leece@vodafone.co.nz


Photobucket